

If this is your first visit, please sign up for email alerts (in the right margin) so you don’t miss out on daily DIY ideas & inspirations!
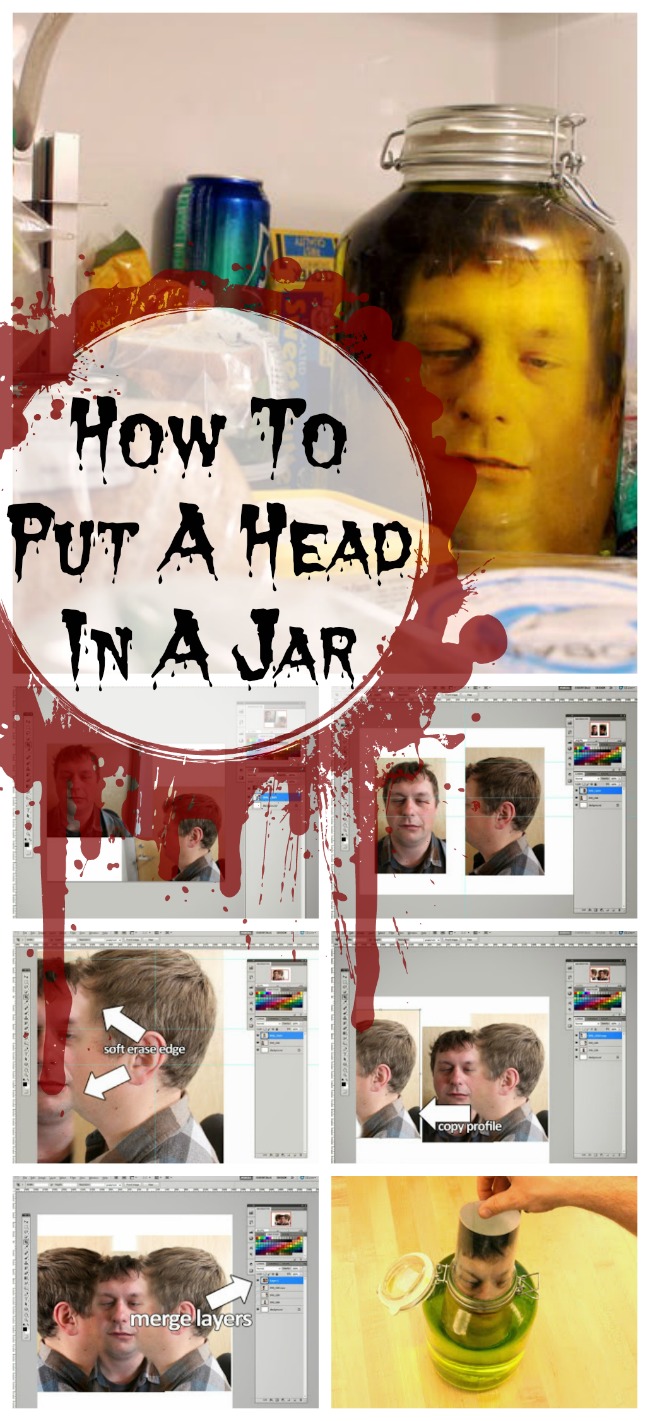
I’ve been seeing this head floating around the internet recently. But, along with this guy missing his body, he was also missing his instructions. Well, I finally found them at ingeni4ndo.blogspot.de. Unfortunately, they are in spanish. Fortunately, I was able to translate (with a little help…okay, a lot of help from a friend). According to the original blog post, when the image is inserted into the jar, the curve of the jar along with the water will distort the image giving it the illusion of a severed head. So here’s the tutorial translation (along with a bit of my own commentary)…
Materials:
Photo Editing Software
Digital camera
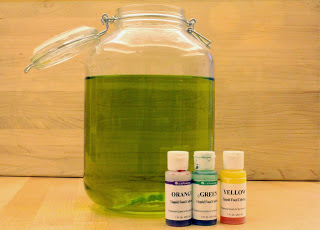
Large jar
Food coloring
Paper laminator (available at any print/copy shop)
Step 1:
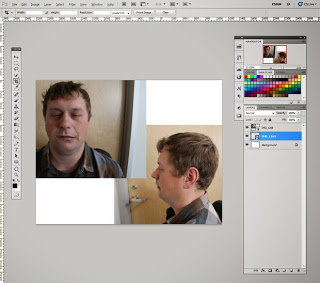
To create the head image, take two photos of someone’s head; one from the front and one from the side. Make sure your subject is well lit and ask them to make a strange face.
Open you photo suite software and set your page size to standard A4 / 8.5 “x 11” print. Import the two images to a new layer and resize it to fit your workspace. We will resize again after merging the faces together.
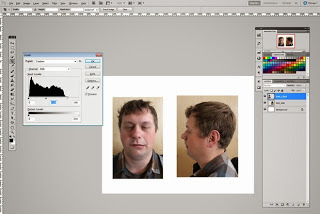
Step 2: Adjust levels + align images
Use your photo editor to cut any plane that is not the face. After trimming, if two images have a different lighting, set light levels (ctrl + L in most applications). Using the eye as a level, align the two images matching up the features from the profile to the portrait (eyes, mouth, nose all aligned). Almost all photo editors have a function rule, these help keep certain things aligned.
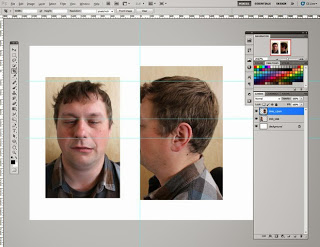
Step 3: Crop Profile
To combine the two faces together you will have to remove part of the face profile image. Make a choice according to the profile (photo 1) and delete the face (Figure 2). Then move the profile image of one side of the picture to match the location of the eyes (Figure 3).
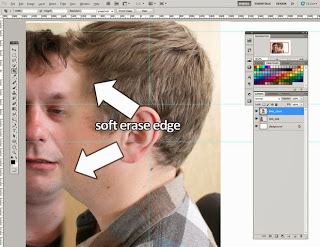
Step 4: Removing profile edges
Select the eraser tool and put it on a soft brush. Delete the edge of the profile picture in which the two faces meet. Change the opacity of the eraser brush to blend away some of the details and mix the two images.
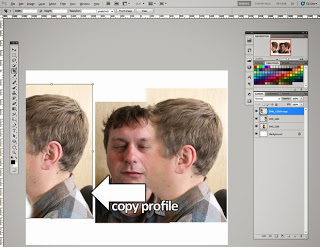
Step 5: Copy
With a completed profile side, duplicate the profile and paste it into a new layer. Flip the copy horizontally and move to the other side of the portrait image. You may need to adjust the levels of the duplicated layer to match the picture, and use the eraser tool again to feather away and mix the duplicated portions of the profile portrait. Do not worry too much about the chin and neck, they will be cropped out of the picture when we’re ready to print. You must have a reasonable version of a flattened head.
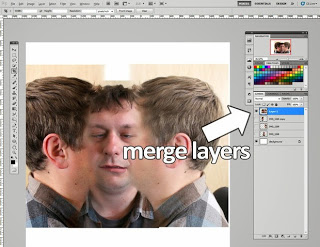
Step 6: Combine and resize
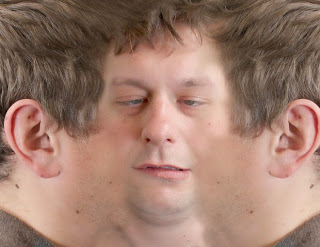
When satisfied with the layering, mixing, and lighting levels, merge the layers together. Then resize the image to fit your workspace. You can enlarge your image to trim the neck and top of the head, or you can work more magic with your brush in these areas, such as with the Clone Stamp tool, or prediction tool (depending on your photo editor).
Step 7: Save print file +
Save the image and print. There should be an option in your print dialog box that allows you to fill the page with your image, it will read “fit to media” or something like that.
Step 8: Laminate
Laminate your image so it doesn’t disintegrate in the fluid. Most office supply stores, libraries or copy centers can do this for about $1.

Step 9: Prepare bottle
You need a big enough jar to contain the image. A large-sized mason jar works great — after all, they are good for preserving. ;-)
Fill the jar halfway with water, I used a mixture of yellow, orange and green liquid food coloring. Tint water to resemble a preservation solution, as in the science fiction films of the period.
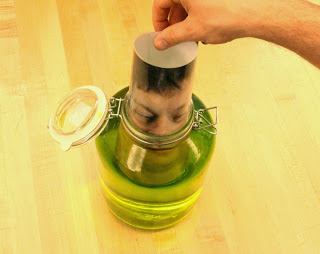
Step 10: Put head in jar
Insert laminated print into jar. Add water until jar is full. Close lid and seal. Your head in a jar is now ready to be placed inside the fridge for a midnight snack.
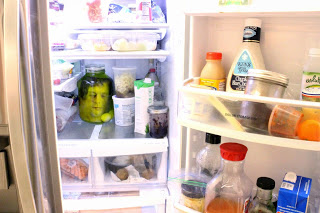
Step 11: Place in the fridge
Place jar in the refrigerator. You can try hiding it behind other items so when someone in your family digs through, they’ll get a lovely surprise.
Now, run along kids and scare the crap out of the people you love most!
And for more Halloween craft fun, try making this super easy DIY CONCRETE TOMBSTONE. You can literally make this in 10 minutes. So easy!

Oh my, this is the spookiest halloween craft ever! It looks so real :-O Loving it :)
I would love it if you share it with my Big Autumn Bash Link Party
http://milaslittlethings.com/2014/10/big-autumn-bash-the-link-party.html
Stopping by from Saturday Sparks Link Party
xx
Mila
[email protected]
Thanks so much. Will definitely stop by!
What photo editing software did you use? Was it easy to manage all of the editing?
Hi Hannah, As mentioned in the first paragraph, this tutorial is a translation from a spanish website. According to the website, it just says “editing software.” I’m not sure how much that helps, but I’m guessing they’re using Photoshop or similar.
just stumbled on your site, great idea for the head … love it … For those having problems with “editing” the head, may I suggest taking your project to the local high school computer club … LOTS of kids will be eager to help (especially when they see the end results) … hope that helps
can I hire you to make this project for me?
Thank you very much
LOL. :-)