

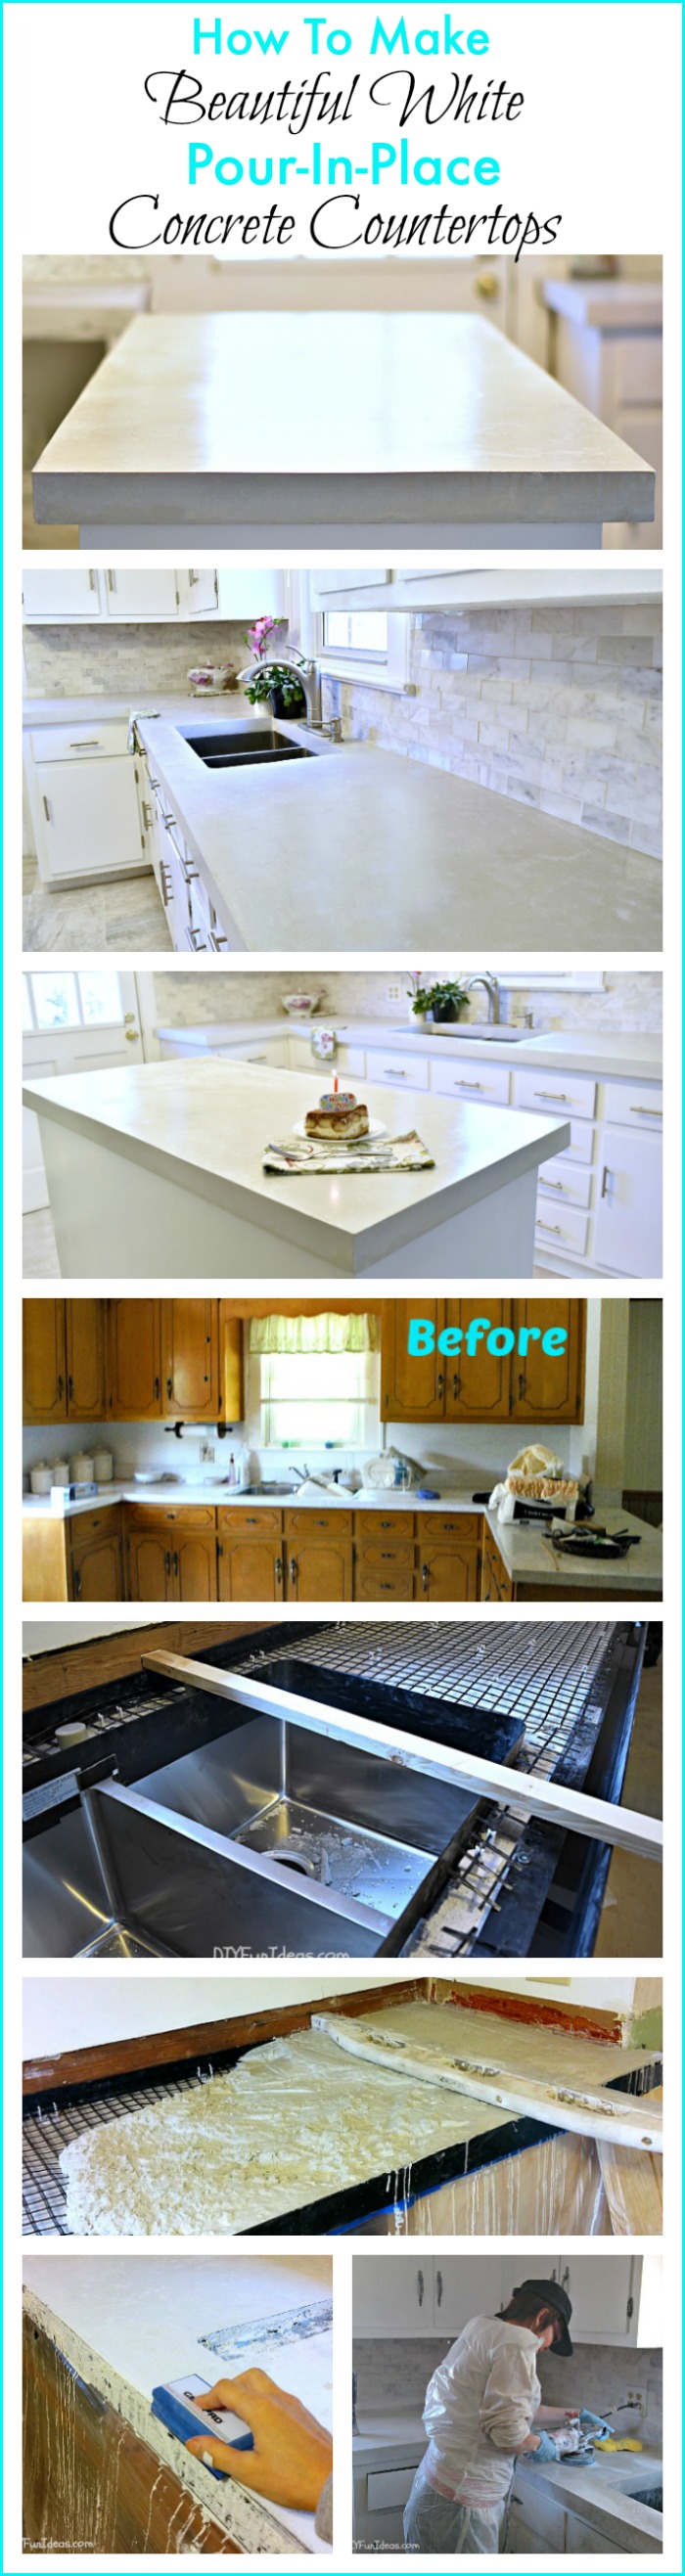
Last week I shared my cousin’s drop dead gorgeous DIY kitchen makeover that included DIY cast in place white concrete countertops. And I promised to share the tutorial for the cast in place countertops. So here I am today with the whole nine yards.
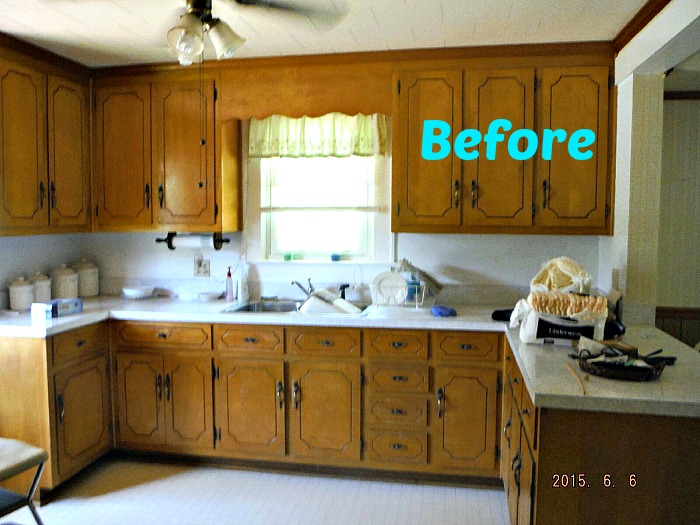
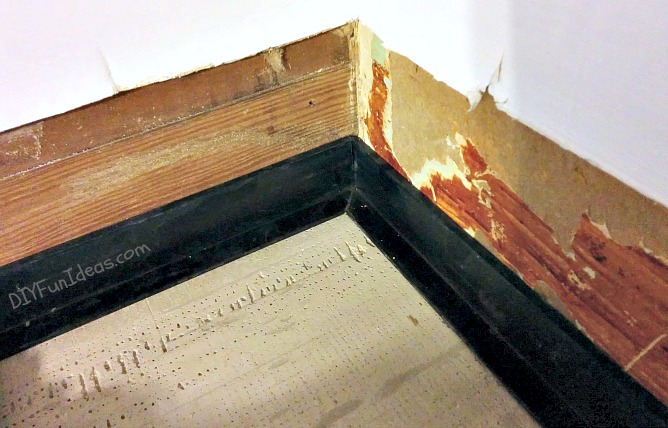
If you recall, my cuz, Jeannette, recently purchased a fixer upper. Here’s what the kitchen looked like before we got started…
She always wanted a white kitchen with white countertops. And being the DIYer that I am, who happens to love working with concrete, I found the perfect solution from Z Counterform Concrete Countertop Solutions. Z Counterform has a white concrete mix and an easy system for pour in place concrete countertops. And now they’re offering a 15% discount that is good until May 31, 2016. Read on for details.
Before this project, I had only ever built pre-cast countertops, meaning countertops that are poured into a melamine mold. The Z Counterform system is set up so that you can pour your countertops right in place over your existing kitchen cabinets. So there’s no melamine forms to build.
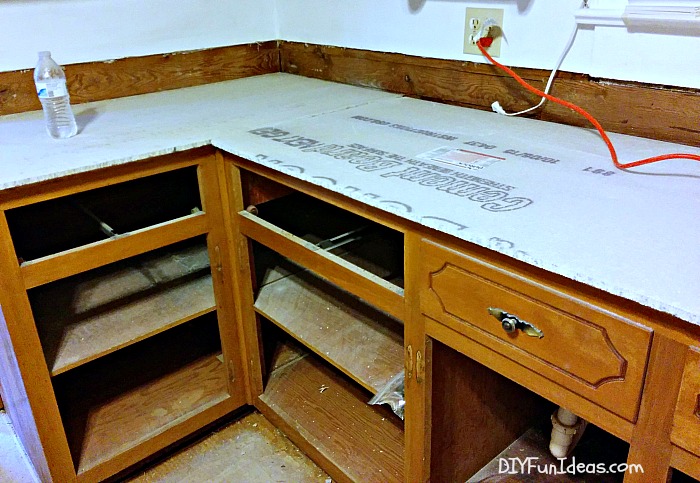
To build your Z Counterform concrete countertops, start with Durock cement board (available at any home improvement store).
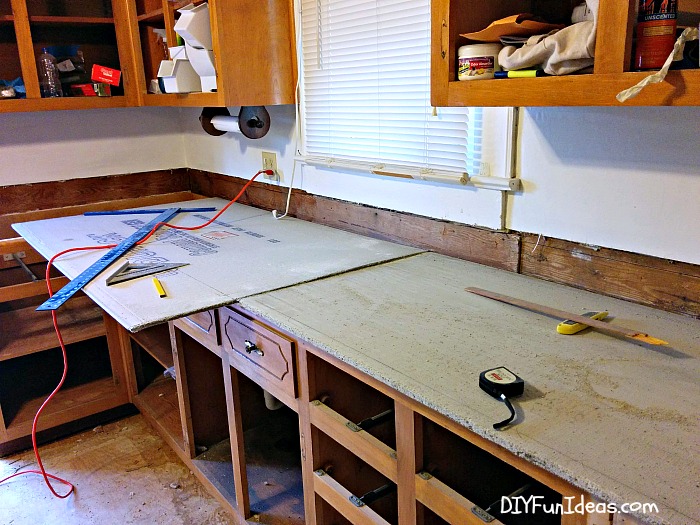
Measure and cut your cement board to cover your countertops. When measuring, I like to actually lay the cement board on the countertop to mark my cut lines, rather than measuring and transferring the measurement to the board. I find this system a little quicker, easier, and more accurate. To cut the board, I used a jigsaw with a diamond blade.
Here’s what my cement board covered counter looked like…
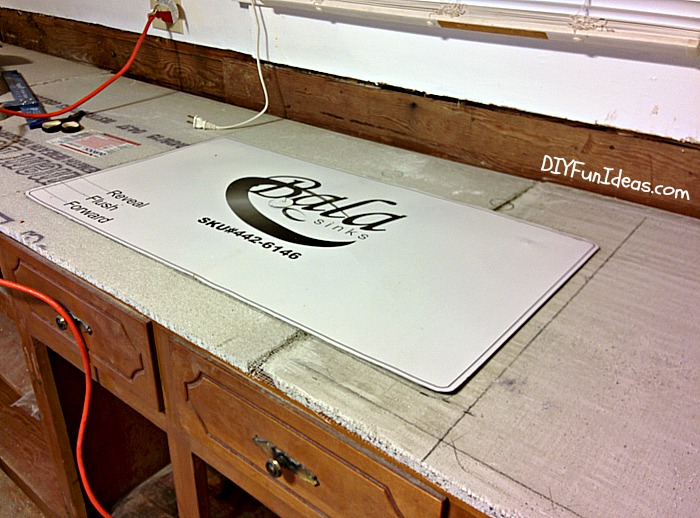
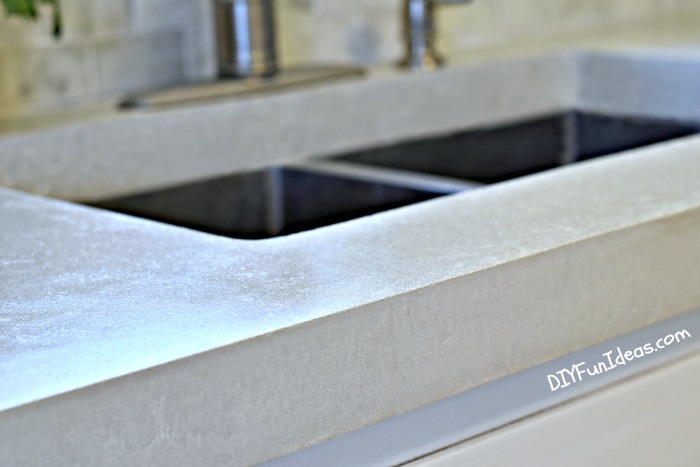
This counter also housed the sink so I had to cut a hole in the cement board to place the sink.
Of course, when unpacking the new sink, my little stinker had to jump right in the action to check things out.

A new sink will come with a template for cutting your sink opening. Place the template where you want your sink and trace around the template. Then cut the hole out with your jigsaw.
You’ll also need to cut holes for your faucet and any other accessory like a sprayer or soap dispenser.
Once your holes are cut, if you’re using an undermount sink (like we did), install your sink under the cement board.
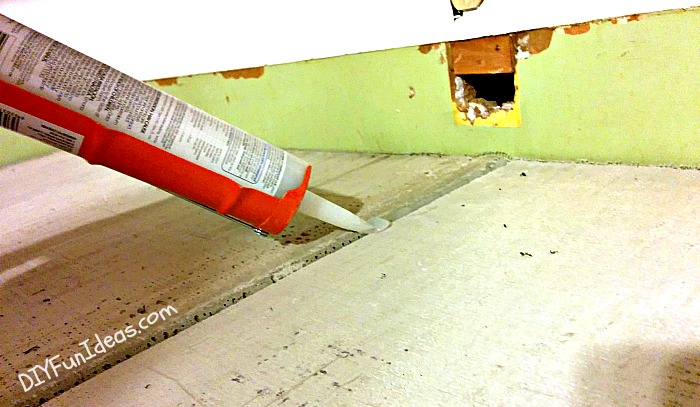
All cement board joints need to be sealed. I used caulk to seal the joints, but some concrete still seeped through into the cabinets below. The very helpful folks at Z Counterform who were there for all my zillion questions, suggested covering the joints with duct tape on the next countertop.
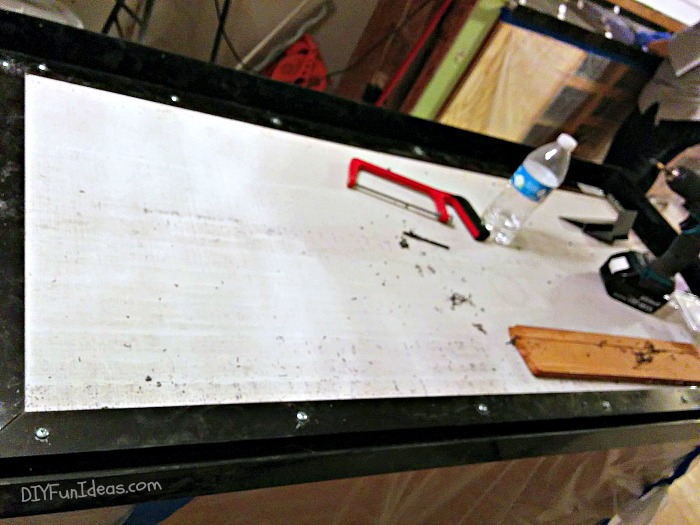
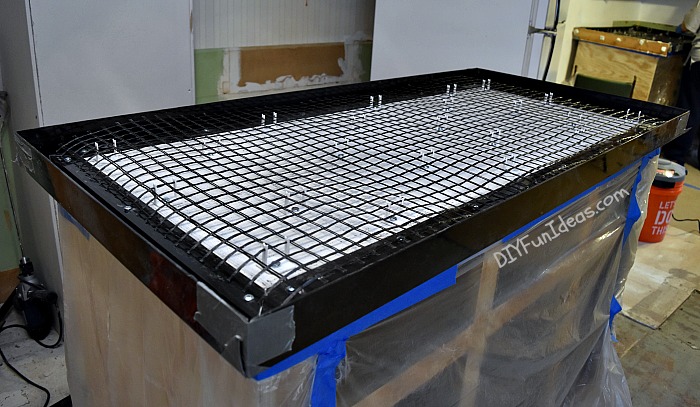
Next, measure and cut the Z Counterforms edge forms and screw them into your countertops using #10 x 5/8″ screws. This is what the island looked like after the edge forms were cut and screwed in…
Internal and external corners need to be mitered.
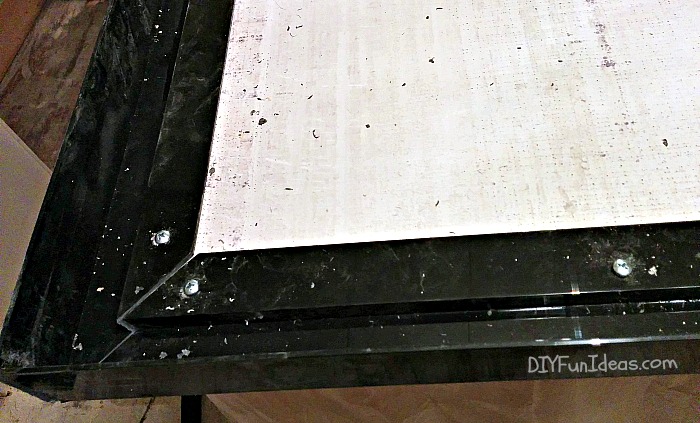
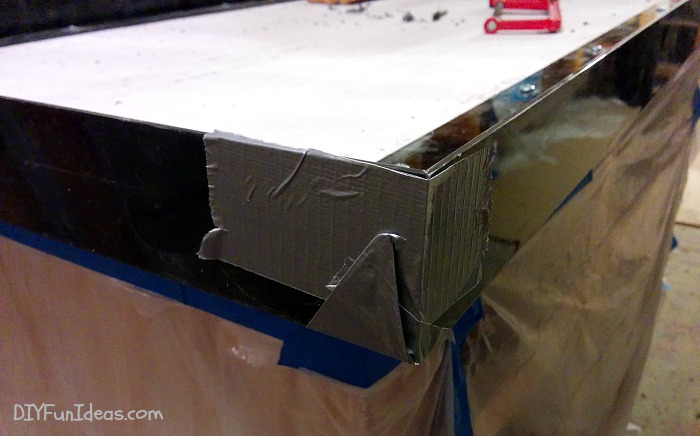
Use duct tape to seal the corners of the external edges.
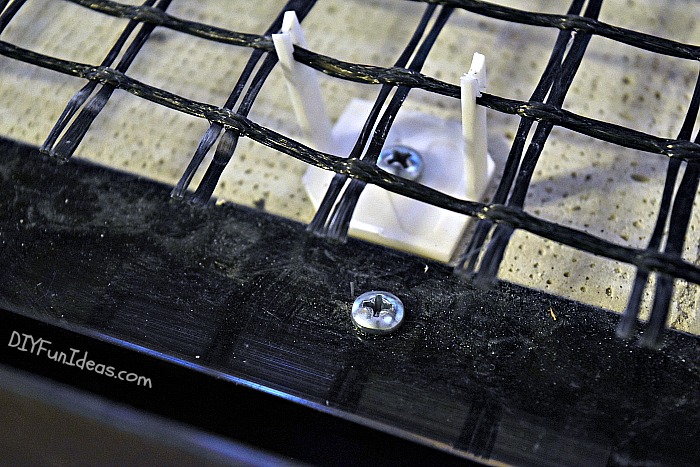
The kit comes with clips that are used to hold fiber glass mesh in place on the countertops.
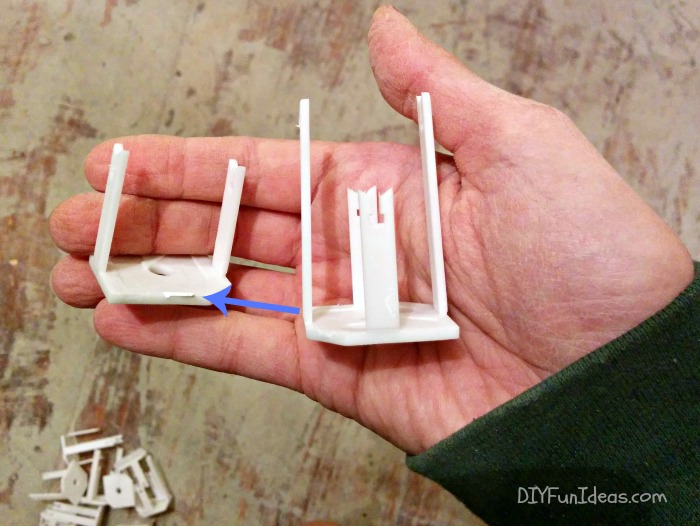
You’ll need to snap off the longer arms on the clips. Those are used for deeper countertops.
Once you’ve snapped off the longer clip arms, screw the clips onto the cement board and clip your mesh in place.
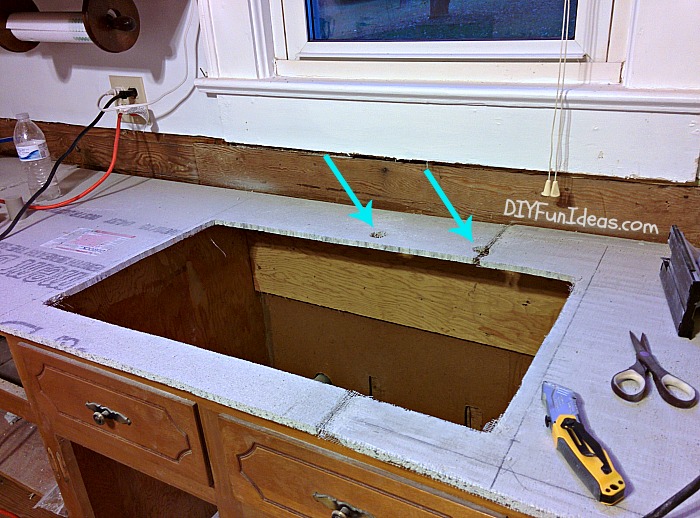
Here’s the sink counter with the clips and mesh installed…
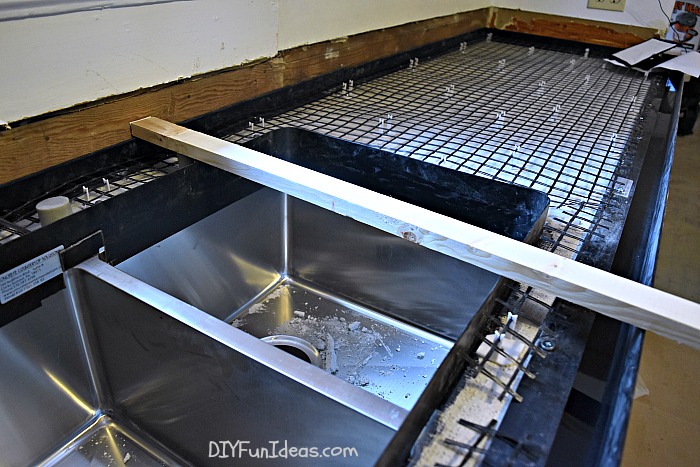
To create the countertop edge around your undermount sink, use the Z Counterform sink form. The sink form is an 8-foot self-adhesive strip of plastic. The form is very stiff so it took a bit of work to form it around the sink, but once you get the shape you just peel off the adhesive strip and stick it on the sink edge. I was surprised at how well the form stayed in place.
Before removing the adhesive strip on the sink edge form, make sure that you’re placing it at the same height as the front and back edge forms. To do this, I placed a strip of wood from the back edge to the front edge to make sure everything was even.
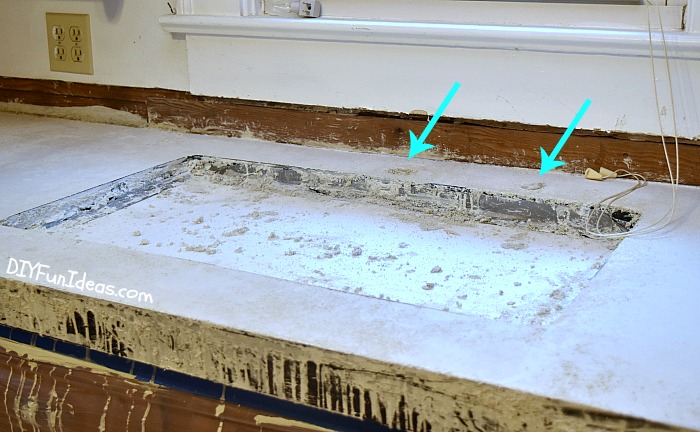
Also, before placing the sink edge form, in order to ensure that the edges of the cement board would not be exposed once the edge form was removed, I chipped away at the cement board around the perimeter of the sink so that the cement board ended about an inch from the edge of the sink. That way, the concrete would be able to fill in that area and cover the edges of the cement board. If you take a close look at the above image, you’ll see some pieces of chipped away cement board in the sink and you can also see how the cement board doesn’t butt all the way up to the edge form.
Alternatively, you can install your under mount sink on top of the cement board. The sink will end up being permanently encased in the concrete, but you won’t have to deal with the possibility of the cement board showing through.
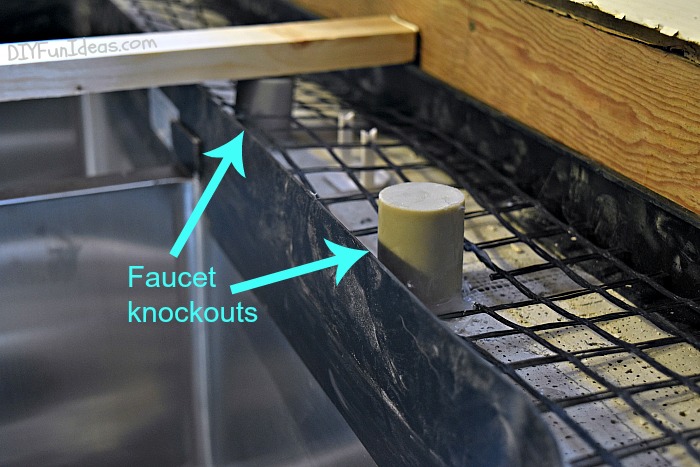
You’ll also want to install “faucet knockouts” through the faucet/soap dispenser holes that you cut earlier. To do this, push the knockouts up through the underside of the cement board.
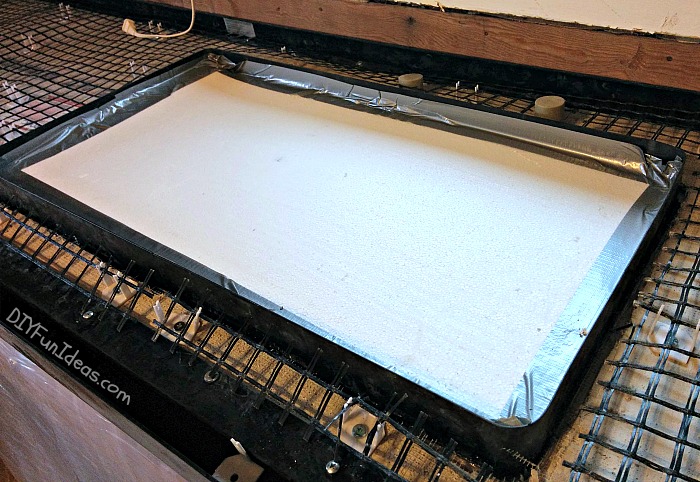
To protect your brand new sink from getting concrete all over it, you can place your sink template over the sink opening and duct tape it in.
Here’s the island all ready to go…
Before pouring your concrete, make sure to cover your cabinets and floors with plastic. I’m sure there are folks out there that can make beautiful cast in place countertops without making a mess, but I’m not one of them, as you’ll see in the upcoming photos.
Now, up to this point, all the work was a solo act done by moi. But it was now time to mix and pour the concrete. So I recruited my cousin for the mixing so I could work on the next steps.
All the mixing was done one bag at a time in a bucket using a low speed drill and a mixing attachment. Z Counterform suggests mixing in a 5 gallon bucket, but trust me when I tell you to mix in a bigger bucket. We started with a 5 gallon bucket and it was miserably difficult to mix 50 pounds of concrete in that little bucket. Luckily we also had a 19 gallon bucket on hand which made mixing sooooo much easier.
When mixing, first pour one quart of water into the bucket. Start adding your concrete while mixing. Continue adding the concrete as you mix and up to a total of 2.5 quarts of water. We found that adding the full 2.5 quarts per 50 lb. bag led to quite a bit of fluid coming to the top of the concrete once poured, so you may want to try adding a little less water. Although, less water makes it more difficult to mix the concrete, so you’ll have to play a little with what works for you.
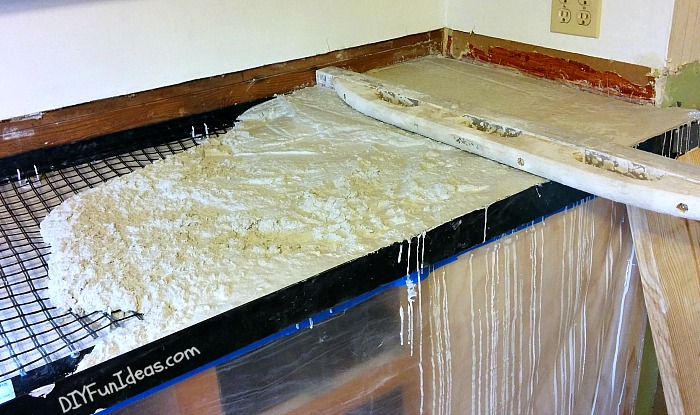
While my cuz was mixing the individual bags and slowly adding each to the counters, I was working on spreading and screeding the concrete. Screeding is the process of leveling the concrete. You can use a 2’x4′ to screed. But I used Z Counterforms’ screed. It has handles, which makes it very easy to maneuver. It also has a built-in level, which is nice, only it kept getting covered with concrete so I really didn’t use the level much.
To screed, move your screeding stick in a short sawing motion as you move it forward across the concrete surface. This will push the high spots down and will reveal the low spots. You’ll have to screed the same area multiple times, filling in low spots and screeding excess off the high spots. You can see on the right side of the above image how the screeding was beginning to give me a level surface.
You’ll also want to vibrate the edges which will help remove any airpockets, which will leave voids on your edges. To vibrate, you can tap the edges with a hammer or you can also use a finish sander on the edges (without the sandpaper).
After screeding your countertop, you’ll see a bit of excess water “bleed” to the surface. Hang back for a little while and let the water dissipate until you’re left with a creamy surface.
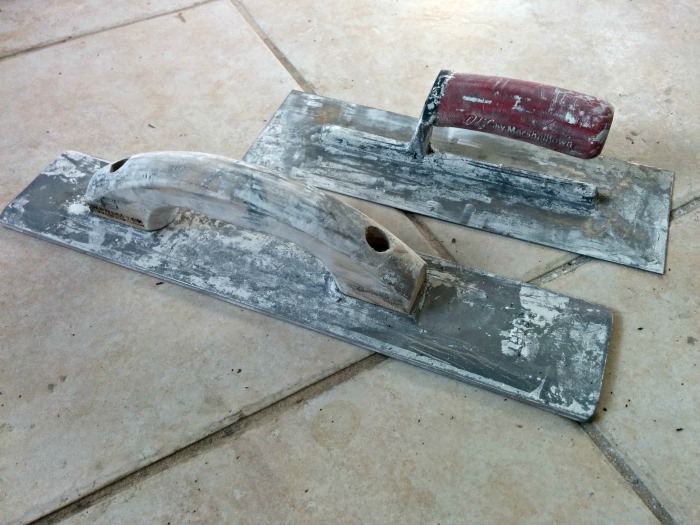
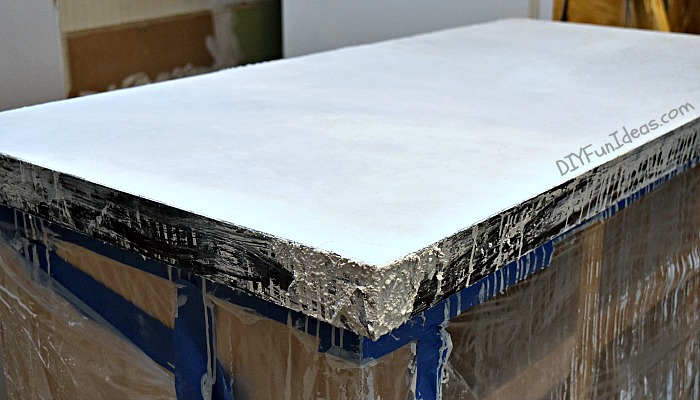
Next, further smooth your concrete surface with a magnesium float. Follow that up by troweling, keeping your trowel at a low angle to the concrete while applying pressure with each pass.
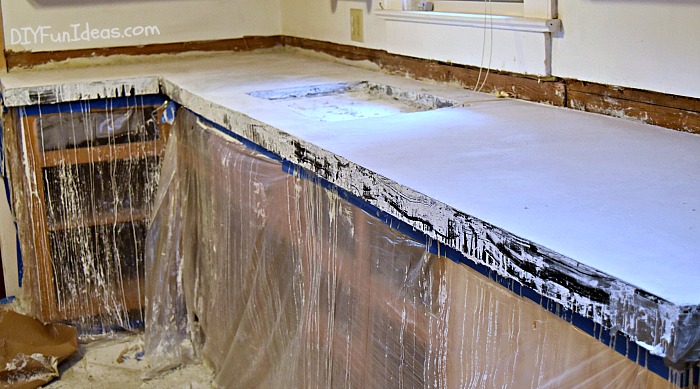
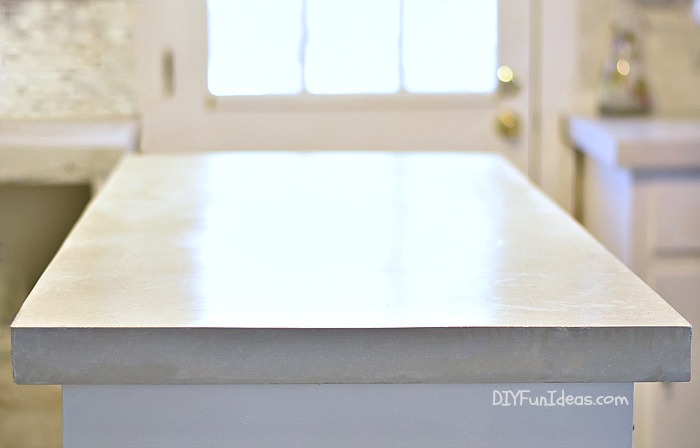
Here are my screeded, floated, and troweled countertops…
After your concrete is dry (wait at least 24 hours), pop out your faucet knock outs.
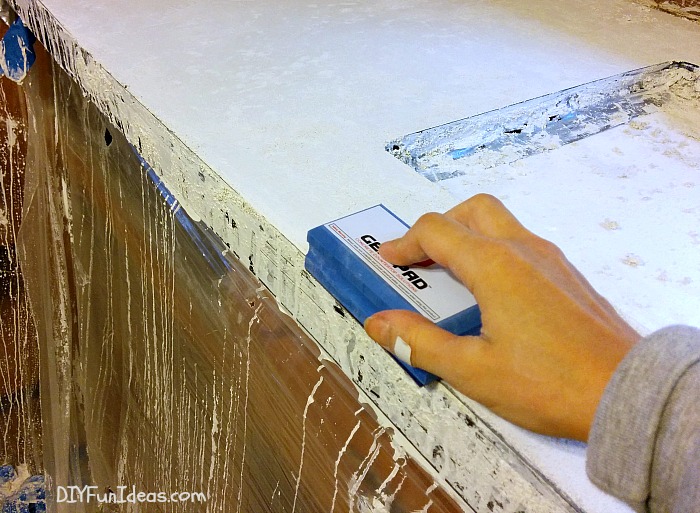
Before removing the edge forms, use the Z Gem Pad that comes with your kit to sand down the edges along the edge forms. Then all you need to do is pull the edge forms down and they’ll pop right off. Do the same with the sink edge form.
Then sand the entire surface until perfectly smooth.
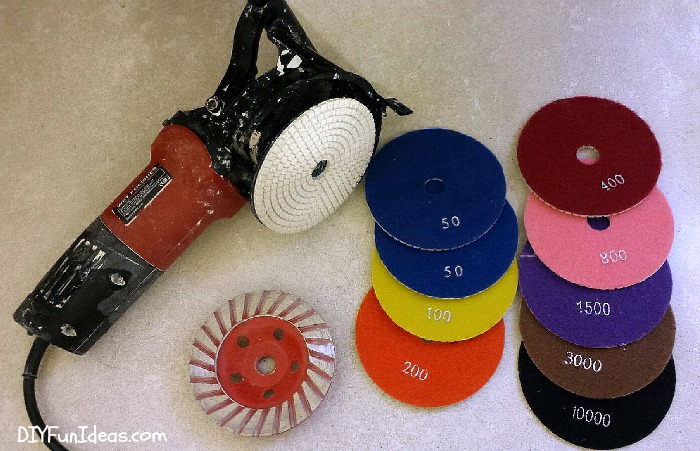
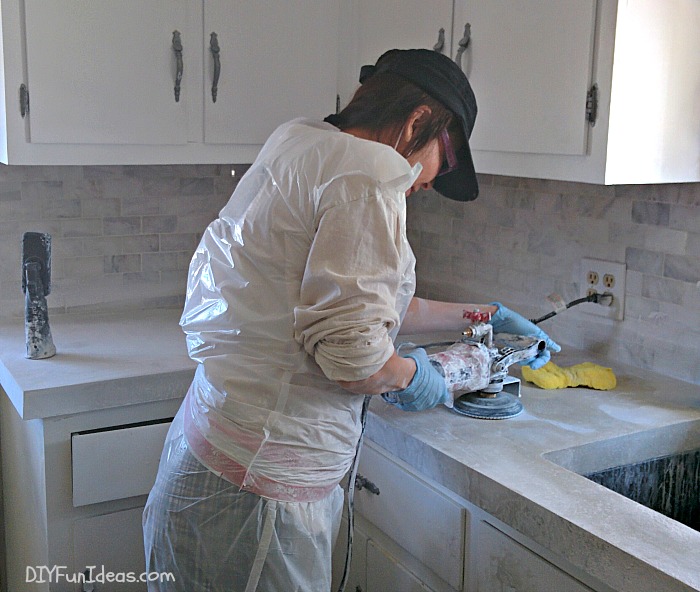
At this point you can seal your countertops or take an extra step and wet polish the countertops. My cousin wanted her countertops to have a super smooth glass-like finish, so she picked up THIS wet polisher on Amazon and put me to work (funny how that happens).
If you’ve never used a wet polisher, this is what it looks like…
And here’s a close up of the surface of a polishing pad…

A wet polisher basically has the motion of a random orbital sander, along with a hook up to attach a hose so that water trickles out while you’re polishing. And it makes a BIG wet mess, thus my haute fashion statement…
Everyone’s now wearing it in Paris. What can I say, I’m such a trend setter.
When I started polishing, I had the hose coming in through the window, but I found it difficult to maneuver the polisher with the big fat hose attached. So I ended up removing the hose and instead continually poured water on the counter from a cup, which worked much better for me. I did forget to cover the cabinets in plastic before I got started. And when my cousin walked in her jaw nearly hit the floor when she saw the mess I’d made on her newly painted cabinets. Doh! Sorry. I guess I was just a little eager to get going.
The pads that came with the polisher go up to 3000 grit, but I only polished using the 30 and 50 grit and the countertops turned out fantabulous and beautifully smooth.
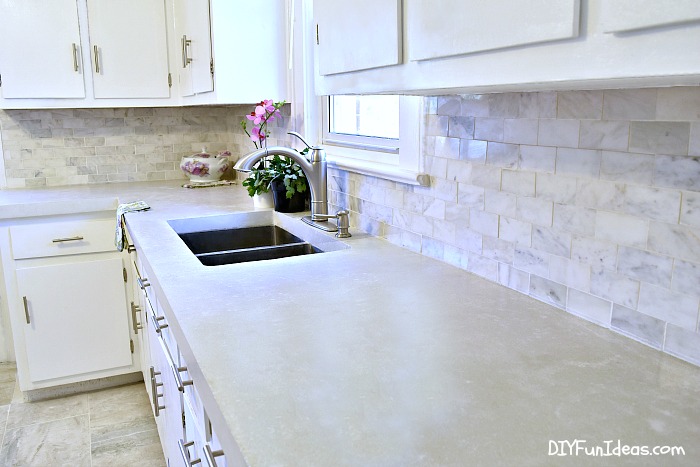
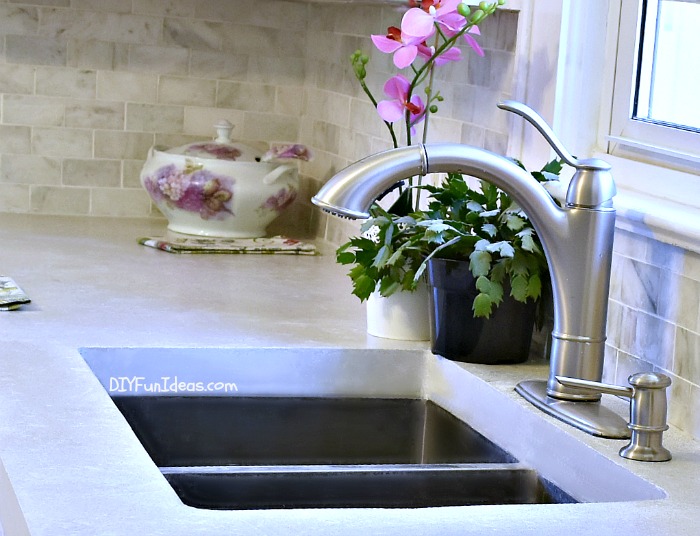
Polishing revealed the aggregate which has a grey undertone, so it actually darkened the countertops just a bit so that they’re more of an off white now. But I think if you were building your countertops on dark cabinets, the high contrast with dark cabinets would make it so that you probably wouldn’t even notice the change in color.
For the final steps, I used a 1/4″ nap roller to apply three coats of Z SiAcryl 14 sealer, allowing the sealer to dry between coats, followed by two coats of Z Counter-Shine Polish.
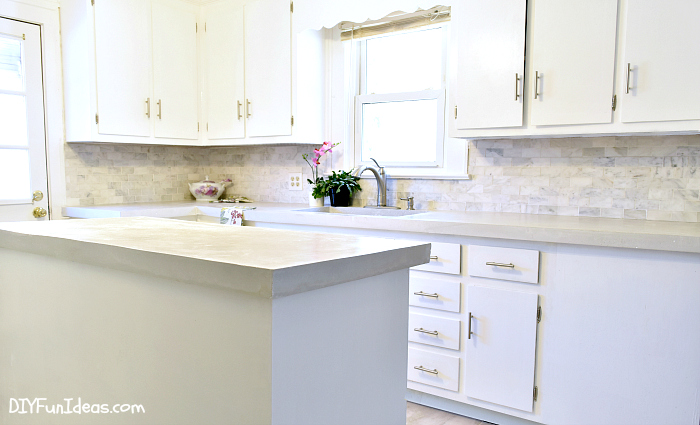
The countertops turned out beautiful, as did the rest of the kitchen. (Click here to read about the other budget updates made to the kitchen.) We couldn’t be happier with the result.
For anyone wondering if they could DIY some gorgeous white concrete countertops, I would tell you that I didn’t consider the process difficult, although it does take some time to get everything ready to pour. But once you get to pouring, you’ll have that part done in one afternoon. Everything except for the mixing/pouring portion can be done solo. But you’ll definitely need a second person when it comes to mixing/pouring.
One of the things that I really appreciated about working with Z Counterforms is their amazing customer service. Dario at Z Counterforms helped me with my order. We initially spoke on the phone and he helped put together a package of everything I needed. He also sent me an extremely helpful video that took me through each step of the process. And then he answered dozens of questions by email and was always very prompt in responding to my questions. It was really a pleasure working with him.

And now, Z Counterforms is offering a limited time 15% off on their countertop system by using promo code DIYFUNIDEAS at checkout. The promo code is only good until May 31, 2016 so don’t wait too long.
For more info, visit Z Counterforms at concretecountertopsolutions.com or call them at 570-587-3799 or email Dario directly at [email protected].
And please, as always, let me know if you have any questions that I can help answer.
Thanks so much and have a wonderful day! Oh, and don’t forget to pin this post and share with your friends!
xoxo
This post linked to some of these totally fabulous blogs and Remodelaholic.
Wow that looks great! One question I have is: if the undermount sink is mounted under the cement board and you are using the sink form, how did you form the sides of the sink without having cement board exposed? I have heard the only other way is to mount the undermount sink OVER the cement board but underneath the concrete, making it permanently attached.
Thanks so much Ed! And that’s a really great question that I didn’t even think of addressing, but will now add to the tutorial. If you take a look at the image of the sink counter that has the mesh exposed, you’ll see some pieces of crumbled cement board in the sink. What I actually ended up doing was chipping away at the cement board around the perimeter of the sink so that the cement board ended about an inch from the edge of the sink. The concrete was then able to fill in that area and cover the edges of the cement board. Hope that helps and please let me know if you have any more questions. :-)
Awesome thanks so much for the tip!
Wow!! These look great. And cute dog.
Those countertops look gorgeous. Very nice job. It sounds like it was a lot of work, but definitely something that is doable. Have you worked with cement before? Just wondering if having experience pouring and leveling cement helped with this project. Thanks!
WOW. This is beautiful. It’s like it was meant to be I came across your blog today; my husband and I just got into a larger home in the country and I want to redo the kitchen (cosmetic updates; it doesn’t need to be gutted). He isn’t so keen on the idea, though. I am so going to show him this (haha I got excited to tag him then had to remind myself, “Uh you’re not on Facebook.”)
That’s hysterical Heather! But, hey, you can tag him here: https://www.facebook.com/permalink.php?story_fbid=1110459588975783&id=133047246717027
See, it was meant to be! :-)
These countertops are absolutely beautiful. I would love to have them in my kitchen. Maybe one day I can get my husband to do this for me. Fingers crossed!
Thank you so much Gwendolyn! Fingers crossed. Or you can do it for him! What can I say, I’m all about going for it. Lol. :-)
Stunning! DH and I are house hunting and a kitchen renovation is inevitable. I had concrete counters in my last place, and I’d love to have them again. This post could save us some major cash, especially here in Denmark where everything costs a fortune! Thanks for posting this, Pinned :)
Thank you so much Sage! I wonder if Z Counterform ships to Denmark. :-)
I have seen concrete counter tops before and they really are beautiful. You did an amazing job! Thanks for sharing this great tutorial with SYC.
hugs,
Jann
Wow! What a great job. These countertops look amazing! I love your little dog getting involved. I bet she got in the way! When I was a kid we blocked off our chimney. My Dad had just finished when we heard “miaow, miaow.” Yep, he’d bricked her in. He was NOT impressed.
Oh no! That is terrible…and hysterical at the same time. Poor kitty and poor dad! But yes, when it came time to actually poor the concrete I had to put her in her carrier so she would be walking through all the concrete that I spilled. She likes to check everything out so I made sure to place her where she had a good view of the action. Anyway, thanks so much. My cousin is loving her new countertops.
Your kitchen transformaiton is just amazong! I like the indusrial look and feel of the concrete coutnertops. They have really made your kitchen bright and a happy place to be.
Thank you so much Vidya! It is amazing how much the whole transformation has brightened up the kitchen!
Wow, now this is a great guide for what you did! I personally love white countertops too because it makes the whole room look clean and bright. I’ll be taking note of your tips!
Thank you so much Aileen!
Oh, how beautiful! I have been researching DIY sites about concrete counter tops
for 2-3 years. I want to do this but am 77 & not sure I could complete all this by myself. I might could get my hubby (84) to mix the concrete. Are there any companies that can help??? What equipment/tools would I need to buy or can I rent
them? I live in Jacksonville, Fla. Is there anyone out there that can help? How much would you charge? Know you need to see my kitchen first…..
Home- (904) 570-9954
Hi Jan, I am so flattered by your comment. I’m not sure I’d be the right person to do your countertops. This was only the third time I worked on concrete countertops so I’m still learning as I go. There are however a lot of companies out there that will do concrete countertops which you can find online, and if they’re not located right in your city, many will travel a few hours for a job because what they’ll do is template your countertops, take the measurements back to their shop to actually build the counters, then only have to return to install. After just a brief search online I found THIS PLACE in St. Pete that’s has some really pretty work in their photo gallery. But I’m guessing you can find someone even closer to you.
I don’t know what shape your husband’s in, but I don’t think I’d recommend having him do all the mixing. It does take a bit of endurance to mix 22 50-lb bags of concrete by hand. My cousin actually let her 16 year old son try mixing a couple of bags because she has a torn rotator cuff and it was wearing on her, and he even thought it was a bit demanding. So if you do try to do it yourselves, I’d say definitely rent a cement mixer and have someone available who could lift and dump the 50-lb bags into the mixer.
I hope this helps. Please do let me know if there’s anything else I can help you with.
Wow, 15% discount is huge! This is a great deal for house owners who would like to remodel their kitchen countertops at this time. I’m not creative when it comes to this work so most probably I will prefer hiring a pro to get it done.
Wow! Your countertops turned out quite well! That looks like one heck of a job. Kudos to you for taking on such a large project! I’m impressed. Thank you for joining us at Thursday Favorite Things Blog Hop.
Olivia, co-hostess
Reinvented Collection
Awe, thank you so much Olivia. We really love how they turned out. And thanks for hosting the party! It’s always a pleasure stopping by to see what’s going down on Reinvented Collection!
I don’t know if this is a task I could do but it turned out amazing!
Thank you so much Becca! But if I can pull it off, then I really think anyone can. :-)
Whooaaa…. color me impressed. I can do a bit around the house, but when it comes to renovation like this, I would have to pick up the phone and call for someone. What an incredible finished look. I love it!
Thank you so much Katie! But I bet you could do it. It looks a little intimidating, but if you break it down to individual steps, it really is doable. And if that doesn’t work, put it on the “Honey-do” list. :-)
AMAZING!
I’m pinning and sharing on the blog today!
XO
OMG, Desiree, you are so awesome! I don’t know if you remember, but I met you briefly last year at SNAP. I was the chic with the tiny little yorkie in my bag. Anyway, I still remember your talk because it was so inspiring! For me, pretty much the best presentation of the weekend. Unfortunately, I won’t be attending this year. But thank you for featuring my project. I am REALLY REALLY thrilled!!!
I am blown away!
Thank you so much Jenny!
Hi. We actually did this to our first house and right now it’s not turning out so well. As you said when wet sanding it exposed all the aggregate and took off all the beautiful white color. Our custom cabinets are a dark grey so the counter needs to be pure white. We don’t know where to go from here. Please help.
Mailing you direct Kasey.
Hello I LOVE the countertops! We are currently renovating our kitchen and have off white cabinets. I would love concrete countertops too but my husband is worried about them near the sink. He thinks they will absorb water. What did you find from your research?
Hi Jacqueline, Thank you so much. Actually, once you seal your countertops, they will not absorb water. As a matter of fact, I even made a concrete sink (Link Here) for the bathroom and there is definitely no water absorption there. So I say go for it girl!
Pinning this as it is a great tutorial. Love how it turned out.
Thanks so much Debra!
Sorry I went and read all the comments in the vanity section and it answered most of my questions :) I have one more question. Over at a different blog the woman recommends a dropin sink rather than an undermount for the concrete feathering process. Would you agree? She doesn’t say why but I am assuming because the inside part will be exposed to water all the time? It would be great if you can give me your opinion on this! Thank you in advance :)
Hi Amy, My apologies for the late response. If the concern is the exposure to water, if you’re using Rapid Set then that wouldn’t be a concern because Rapid Set is made with hydraulic cement which is mean to withstand water. So I suppose it would depend on the product you use. But other than that I really don’t see the advantage of a drop in sink versus under mount.
Those look awesome!! How much was all the materials everything on average?
Thanks Heidi! Here’s a breakdown of the costs:
Fiber Mesh Reinforcement 1 x $49.99 = $49.99
Magnesium float 1 x $26.99 = $26.99
Square Edge Full Package 1 x $199.00 = $199.00
White Countertop Mix 20 x $29.00 = $580.00
Z Clips 2 x $19.99 = $39.98
Z Countershine 1 x $39.00 = $39.00
Gem Pads 1 x $59.99 = $59.99
40″ Island Screed 1 x $59.00 = $59.00
SiAcryl Sealer 1 x $39.00 = $39.00
Duroc Cement Board 4 x $8.99 = $35.96
Screws 1 x $12.99 = $12.99
Faucet Knockouts 1 x $39.99 = $39.99
Trowel 1 x $12.97 = $12.97
Bucket
Mixing Drill
Sum: $1,194.86
There was also a shipping cost, I think around $400. But if you order before the end of the month, you’ll get 15% off using the promo code in the tutorial.
Hope that helps. Please let me know if you have any more questions.
Looks great! What kind/brand of concrete did you use to get such a white color?
Hi Nicole, Thanks! You can find the white concrete here: http://concretecountertopsolutions.com/products/cement-products/white-countertop-mix/
Please let me know if you have any other questions.
Thanks for sharing and it does look so good but I am in Australia. Is the product available or can you tell me an alternative that will achieve the same result.
Hi Wendy, I really don’t know anything about what is available in Australia. You may want to reach out to my contact at Z-Counterforms ([email protected] ) with your question. He may be able to help you.
The countertops looks amazing! What type of concrete did you use? Did you use a stain to achieve the color?
Hi Alyssa, No, we used a white concrete so no additives were needed to achieve the color. Hope that helps. Thanks!
Thanks. Did you get the concrete through z counterform?
Yes. Here’s a link to the concrete: http://concretecountertopsolutions.com/products/cement-products/white-countertop-mix/
And they’re also offering a 15% off discount through the end of the month using promo code: DIYFUNIDEAS.
Please let me know if I can help with anything else. :-)
I really like the form. Which one did you use?
Hi Adriana, We used the straight edge form.
Hi Jenise I LOVE LOVE this!! But I don’t think I can take on THIS much major DIY. I was thinking of using your rapid set cement technique that you did on your parents vanity in May 2015. How is it holding up? Do you think it will work on a kitchen counter as well? I want a black finish and I have a hard time finding the pigment. Where did you purchase your color pigment? Sorry for all the questions! I am VERY nervous but very determined as well! Thank you very much for all of these tutorials, it must be EXTREMELY difficult taking photos etc along the way WHILE doing everything at the same time but you are helping TREMENDOUSLY and I appreciate all you do on this blog :)
Hi Amy,
My apologies for my delayed response. Yes, the overlay technique should work fine on a kitchen countertop as long as you can roughen up the surface first. But since you’ll be working on a much larger surface than I did, I do recommend using additional Set Control product to further slow down the setting time so you’ll have more time to work.
The bathroom vanity is holding up perfectly. No chips or cracks and the vanity gets used every day. Here’s a link to some black pigment: http://amzn.to/1TNnlRb
Fantastic, I’ve been studying up on Arden this year, and in a month we will be tackling the counters. Their finished product always looks sharp and professional. Great job! Wish me luck!
Good luck Erin, hope it turns out fantastic!!!!!! :-)
Wow nice job .
It looks beautiful
Thank so much Steven! That’s so nice of you to say!!! :-)
This looks so amazing!!! I am getting ready to start my own kitchen DIY and I think this could work. Question though… Did you add any additional support to the concrete boards before putting them on the cabinets? Mainly just worried about the weight of the concrete… Although I guess it’s not any heavier than marble or granite… Anyways, great job!!
Hi Julie, Thank you so much! We’re all in love with the new counters and my cousin has gotten soooo many compliments on them. We actually did not add any additional support and everything is holding up just fine. If you’re going to do this pretty soon, I’d recommend asking Z Counterforms if they’ll still accept the coupon code, since it only just expired. It definitely couldn’t hurt to ask. :-)
The counter ooks great , just a question though … does anyone ever bump into the corners of the counter, it looks like it could hurt. And can the be made with rounded edges instead of 90 degree corners?
Hi Darlene, Haven’t had any issues with bumping the corners. I’m not sure if there’s a mold for rounded corners, but you could certainly grind down the corners to round them off.
Sorry if i missed it but about how much did this cost? They look gorgeous!
Hi Lindy, Here’s a breakdown of the costs:
Fiber Mesh Reinforcement 1 x $49.99 = $49.99
Magnesium float 1 x $26.99 = $26.99
Square Edge Full Package 1 x $199.00 = $199.00
White Countertop Mix 20 x $29.00 = $580.00
Z Clips 2 x $19.99 = $39.98
Z Countershine 1 x $39.00 = $39.00
Gem Pads 1 x $59.99 = $59.99
40″ Island Screed 1 x $59.00 = $59.00
SiAcryl Sealer 1 x $39.00 = $39.00
Duroc Cement Board 4 x $8.99 = $35.96
Screws 1 x $12.99 = $12.99
Faucet Knockouts 1 x $39.99 = $39.99
Trowel 1 x $12.97 = $12.97
Bucket
Mixing Drill
Sum: $1,194.86
There was also a shipping cost, I think around $400, but your shipping cost will depend you location.
Does the countertop turn darker when it’s wet? Also has the countertop stained? We used the same products as you and applied the same coats of sealer and polish but our countertop turns darker when it’s wet. We just want to make sure we have enough sealer/polish.
Looks beautiful. How’s it holding up?
So far (7 months later) it’s doing great! No chips or anything.
How did you polish in the corners with the wet sander?
Hi David, Since the sander is round it couldn’t fit completely in the corners so we did the best we can with fine sanding pads.
Hey great job, was wondering if you used a colorant in the mixture. I really love the color yours turned out. Is it just the Liquid Crete and sand topping?
Hi Jenny, There is no added colorant in the mix. It is just the white countertop mix and then the sealant on top which is clear. Hope that helps. Let me know if you have any more questions. Also, you might want to ask them if they have any current discount promos when you make your order. You might still be able to get a discount. You never know. :-)
Hi,
Looks amazing! What I don’t get is how the edge form comes off if it is screwed to the Durock and under cement.
Thanks!
When you snap it off, the bottom still stays attached to the Durock. To basically it snaps at the joint.
Hi! I want light concrete countertops on white cabinets (Maybe with a gray/brown undertone). Is there a way that i could add some form of pigment to the mix before pouring? If so, do you know a type?
Adding titanium dioxide (http://amzn.to/2sFbsIa) will turn the mix white.
Hi Jenise,
Your work is amazing and inspirational. I would love to try to do this but have to admit am a bit nervous. How long did the entire process take from start to finish ? It sounds like you need a minimum of two people to do the job. Was just curious did you have to have to add the titanium dioxide to your mix to get it white as well ?Apologies if these questions were already asked above
Hi Barb, Yes, I would say that you need at least two people to do this. The concrete mix I used was already white so we didn’t add any titanium dioxide. But it dried to an off white, so you could always trying adding some to get closer to a pure white. The entire process took us two weekends to complete.